
1. Escaping the "Wooden Box"
Every Minecraft player starts in the same place: night is falling, a creeper is lurking somewhere in the dark, and you need shelter — fast. The result is always the same 5×5 wooden cube with a flat roof. It keeps you alive. It does not, however, inspire awe.
The difference between those builds and a flat wooden box isn't talent — it's a specific set of habits that experienced builders apply almost automatically. They break flat walls. They vary block textures. They design rooflines before filling in floors. They treat lighting as an architectural element rather than an afterthought. None of it is complicated once you know what to look for, and this guide walks through exactly that, technique by technique.
In 2026, Minecraft has more building blocks than ever before, including a brand-new palette from the Minecraft 2026 update cycle. But more blocks doesn't automatically mean better builds — that comes from understanding how to use them. Master the techniques in this guide and your builds will improve regardless of which blocks you have available.
Stop thinking of blocks as construction materials and start thinking of them as paint on a three-dimensional canvas. Every block you place is a colour choice, a texture choice, and a lighting choice simultaneously. Great builders think in all three dimensions at once.
2. The Rule of Depth
Depth is the practice of never building a perfectly flat wall. By pushing blocks inward and pulling structural supports outward, you create a 3D profile that generates natural shadows and highlights across the build surface.
Depth is the single most impactful technique in this guide. A wall built from a single flat plane of stone bricks looks like a texture applied to cardboard. The exact same stone bricks arranged with columns extruding one block outward, infill panels recessed one block inward, and decorative trim running horizontally across the face looks like a real structure.
The 1–2–1 Depth Rule
The simplest rule of thumb for wall depth is the 1-2-1 system: your structural columns sit at the front plane (+1), your main wall infill sits one block back (0), and your window frames recess a further block inward (-1). This three-layer system creates light, midtone, and shadow bands that make a wall legible from a distance.
Applying Depth to Windows
The most common beginner mistake is placing windows flush with the exterior wall. To fix this, build a frame using Logs or Stripped Wood around the window opening, recess the main wall material one block inward from the frame, and place your Glass Panes on the inner layer. This instantly creates a windowsill, a lintel, and realistic architectural shadow, adding immense visual weight to the facade with very few extra blocks.
Quick win: Take any existing flat wall on your base and add a row of Stripped Logs flush to the surface at every vertical column point. This single addition adds perceived depth instantly — even if nothing else changes.
3. Texture Blending
A wall built from a single block type looks synthetic and repetitive, because Minecraft's textures tile — and the human eye is very good at spotting repeating patterns. To break up this tiling and make a structure feel like it was built over time, you blend textures by mixing complementary block types within the same palette family.
The critical rule: never use two competing primary blocks at equal proportions. Always establish one dominant block (60–70%), one secondary (20–30%), and one accent (5–10%). The accent block is used for trim, corner detailing, and base/cap transitions only.
Stone Bricks 45% · Regular Stone 25% · Andesite 20% · Cobblestone 10%. Use Mossy Stone Bricks sparingly near the ground and water only — overuse ruins the effect.
Oak Planks 50% · Stripped Oak Log 30% · Spruce Trapdoors for detailing 15% · Dark Oak accents 5%. Avoid mixing more than two wood types — it reads as messy, not varied.
Bricks 50% · Granite 25% · Polished Granite 20% · Terracotta accents 5%. The Granite breaks the harsh red lines of pure brick and adds warmth. Pairs beautifully with Acacia wood trim.
White Concrete 60% · Calcite 25% · Quartz Bricks 10% · Blue-Tinted Glass accents 5%. Edges are everything here — use Stairs and Slabs to keep every corner razor-sharp.
4. Vertical Gradients
Gradients are how you create the impression of scale and geological weight. Real-world architecture gets weathered and darkened at the base — it bears the weight of the structure above it, absorbs moisture, and stains over decades. Your Minecraft walls should simulate this.
The rule is simple: dark and heavy at the base, light and airy at the top. For a medieval castle, this means starting your foundation with Deepslate Tiles, transitioning upward through Cobbled Deepslate → Stone Bricks → regular Stone, and capping towers with smooth Calcite or Diorite. Standing back and looking at this gradient from 50 blocks away is genuinely dramatic — it creates a visual hierarchy that makes the structure feel enormous even if it isn't.
Foundation Layer (Y 60–64): Deepslate Tiles or Deepslate Bricks
The darkest, heaviest block available. This layer sits at or below grade — partially buried to simulate a real foundation. Extend it underground by 2–3 blocks for added realism.
Lower Wall (next 6–10 blocks): Cobbled Deepslate or Dark Stone Bricks
Still dark but with more texture variation. This is where your largest wall features — gates, archways, reinforcement columns — should sit.
Mid Wall (next 4–6 blocks): Stone Bricks mixed with Cracked Stone Bricks
The visual midpoint. Windows and balconies belong in this zone. The cracked variant adds texture without a dramatic colour shift.
Upper Wall & Parapets: Regular Stone or Andesite
Getting lighter. Battlements and crenellations sit here. Switch to a single block type for visual clarity at height.
Cap, Towers & Spires: Calcite, Diorite, or Quartz
The lightest layer. Towers should punch above the roofline in a contrasting pale white. This maximum-contrast top edge makes the silhouette pop at any distance.
5. Roof Overhangs & A-Frames
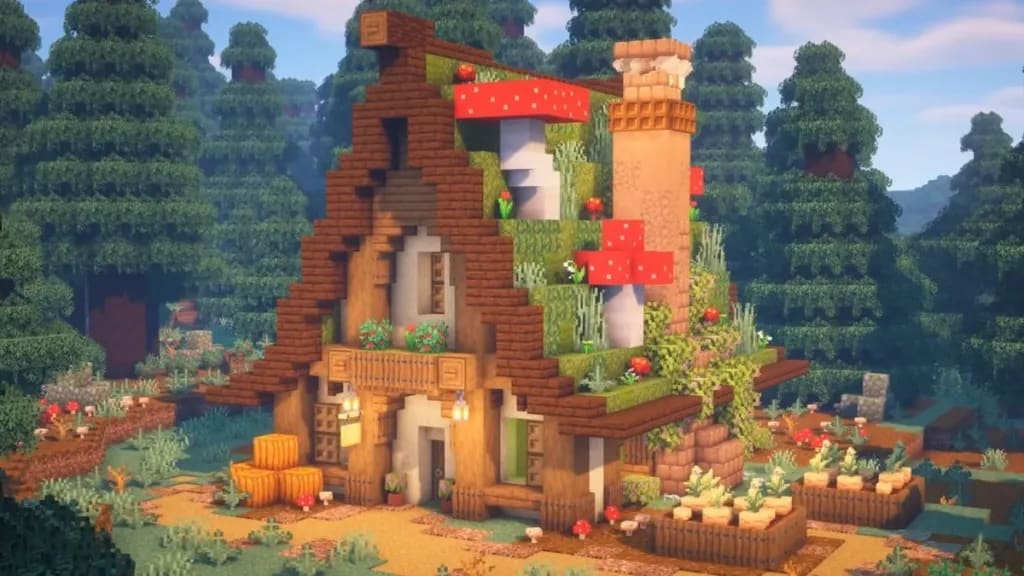
A roof that ends flush with the wall looks unfinished — like a lid placed on a box. Real roofs have overhangs, eaves, and shadow lines that dramatically define the building's silhouette. In Minecraft terms, this means extending your roof by at least one block beyond the wall face in every direction, creating a shadow line along the top of the exterior wall.
The Contrasting Border Technique
Use a dark, contrasting block for the visible roof edge (the outermost row of stair blocks) and a lighter material for the roof fill. For example: Dark Oak Stairs as the border with Spruce Planks filling the centre, or Deepslate Stairs bordering a Copper roof. The dark border creates a clean silhouette visible from far away, while the lighter centre recedes visually and makes the roof feel less heavy.
Breaking the Pyramid Roof
A square house with a pure pyramid stair roof is the single most identifiable mark of a beginner build. The fix is simple: change your floor plan from a perfect square to an L-shape, a T-shape, or a rectangle, and offset your rooflines. Where two rooflines meet, use a gable end (a triangular vertical wall section filled with a secondary material) or a cross gable intersection. This complexity adds massive visual interest to otherwise simple structures.
A-Frame Builds
An A-Frame design — where the roof extends all the way to the ground, creating an triangular cross-section — is one of the fastest ways to create a striking, unusual silhouette. They work beautifully for mountain cabins, forest hideaways, and wizard towers. Use Spruce or Dark Oak for the outer slope, Trapdoors for the triangular gable ventilation sections, and Glass blocks (full blocks, not panes) for any glazed gable sections to get the dramatic effect of the roof meeting the ground.
6. Hidden Lighting
Nothing destroys a carefully crafted atmosphere faster than a row of torches nailed to the wall. In 2026, the meta for lighting is entirely about concealment — light sources that illuminate without being visible.
Place a Sea Lantern, Glowstone, or Jack o'Lantern in the floor, then cover it with any Carpet. Light passes directly through carpet — you get a glowing floor tile that looks like a design feature.
Place a Shroomlight or Glowstone block on the ground and surround it entirely with Oak or Azalea Leaves. Creates a softly glowing decorative bush for garden paths and courtyards.
Light passes through bottom-half slabs. Lay your flooring as bottom-slab Smooth Stone, then place light sources in the block layer below. Invisible from above, perfect illumination from beneath.
Place Item Frames on walls with Glow Item Frames (Glow Ink Sac + Item Frame). These glow at light level 1 — not enough to prevent spawning alone, but excellent as ambient accent lighting in lit rooms.
Place froglights, shroomlights, sea lanterns, or end rods behind trapdoors, slabs, carpets, or glass panes. This gives rooms a modern integrated-lighting look without visible torch spam.
Up to 4 candles can be placed in a single block. A full 4-candle cluster reaches light level 12. Place under a decorative glass cover or inside a hanging lantern frame for a chandelier effect.
Mob-proofing reminder: Hidden lighting only works
if the light level at the floor is 1 or higher. Light level 0
still spawns hostile mobs in Bedrock. Check with
F3 on Java or a Light Level overlay mod to verify
coverage in every corner.
7. Window & Glass Design
Windows are the eyes of a building — they define the character of the facade more than almost any other element. Most players default to a 2×1 hole filled with Glass Panes. While functional, this creates a flat, undistinguished window. Elevating your windows is one of the highest-impact improvements you can make to any exterior.
The Framed Window Method
Build a 3×3 or 4×4 rough opening in your wall. Around the perimeter, place Stripped Logs, Trapdoors open at 90° to simulate shutters, or Slabs as a sill and lintel. Recess the glass two layers inward from the exterior wall face. This single technique transforms a flat hole into a real architectural opening with shadow, depth, and detail.
Glass Panes vs Glass Blocks
Use Glass Panes for standard residential windows — they sit in the centre of the block space and create that characteristic mullion grid appearance. Use full Glass Blocks for modern builds (they create unbroken glazing), greenhouse walls, and underwater viewing domes. Never use full Glass Blocks for cottage or medieval windows — the flat, frameless look is jarring in organic build contexts.
Coloured Glass for Mood
Tinted glass dramatically changes the interior atmosphere of a space. Yellow Stained Glass creates warm candlelight ambience. Blue simulates moonlight. Purple reads as magical or eldritch. Keep tinted glass to accent windows only — one or two per facade — to avoid overwhelming the colour palette of the build.
8. Structural Pillars & Buttresses
One of the fastest ways to make a build look genuinely architectural is to add vertical structure — pillars, columns, and buttresses — that appear to carry the building's load. These don't need to be structurally necessary in Minecraft terms, but they provide enormous visual anchoring.
The Column Formula
A good free-standing column has three components: a base (wider than the shaft — use a full block or a 2×2 slab platform), a shaft (the vertical run — Logs work better than Stone here because their wood grain reads as structural), and a capital (a wider top — use Slabs or Upside-Down Stair blocks fanning outward). This three-part structure looks classical and purposeful rather than like a random pole.
Flying Buttresses
For large walls and cathedral-style builds, flying buttresses — diagonal support arms extending from the wall to a ground anchor — are transformative. In Minecraft, simulate these using diagonal Stair blocks and slabs running at a 45° angle from the upper wall to a vertical pier set 3–5 blocks out from the wall base. This technique is especially effective on circular towers and large hall facades.
Building a large castle or hall? Find the perfect flat plains, river valley, or clifftop terrain with the Minesite Seed Map Planner — now with Java 26.2 and Bedrock 26.30 support.
9. Floor Plans That Scale
The most underrated building skill in Minecraft has nothing to do with blocks — it's floor plan design. Most beginners build one room, then add another room when they need it, resulting in a formless sprawl that can never look intentional. Professional builders design the floor plan before placing a single wall block.
The L, T, and H Plans
Abandon square and rectangular floor plans. The L-shape creates a natural courtyard in the negative space of the corner. The T-shape has a dominant main hall with two flanking wings — ideal for castle gates or large manor houses. The H-shape creates two parallel wings connected by a central bridge structure, which works well for university or palace complexes. Each of these plans creates natural exterior roofline complexity without any extra design effort — the shape itself generates visual interest.
The Hub-and-Spoke System
For large builds, plan around a central hub (a hall, courtyard, or tower) with spoke structures radiating outward. This gives the build a clear visual anchor visible from a distance, ensures all areas are functionally connected, and makes additions feel intentional rather than sprawling. Establish your hub first, lay placeholder walls for all your spokes before filling in detail, and work outward from centre.
Odd-Number Layouts
Odd-number room widths (5, 7, 9 blocks) are aesthetically better than even numbers because they have a natural centre block. A 7-wide room with a window in the exact centre block looks balanced and deliberate. A 6-wide room with no exact centre always feels slightly off. When planning rooms, think in odd numbers by default.
10. Interior Design That Actually Looks Good
Players can spend weeks on a spectacular exterior and then step inside to find an empty box with a crafting table and a bed. Interior design is just as important as exterior work, and it follows its own set of rules.
Furniture Without Mods
Vanilla Minecraft has all the pieces you need for convincing furniture — you just have to see the blocks differently. Here are the core furniture builds every interior decorator should know:
Three Stair blocks in a row facing the same direction = sofa base. Place Trapdoors open on the outside arms for armrests. Add a Carpet of any colour across the top for upholstery.
A 3×2 wall of Black Concrete with a Border-pattern Banner hung centred on it. The banner frame simulates a screen border. Place a full Magenta or White Concrete block behind for the screen glow.
A 2×1 hole in the floor, filled with Water. Surround the edges with Quartz or Calcite Stairs facing inward to form the bath rim. Place a Lever on the wall as a faucet.
Recess a 1-block-deep nook into any wall, 2–3 blocks wide and 3 blocks tall. Fill with Bookshelf blocks. Place a Flower Pot on the top shelf and a Trapdoor as a door over the alcove mouth.
Two Fence posts topped with Pressure Plates (any material) = a table surface. Place Stair blocks facing outward around it as chairs. Add Item Frames on the plates with food items for setting the table.
A 3×2 nook of Bricks or Stone Bricks in the wall with a Campfire or Soul Campfire at the floor level, surrounded by Stairs for hearth surround. Add a Mantelpiece: a row of Slabs one block above the opening.
The Ceiling Rule
The single most neglected surface in Minecraft interiors is the ceiling. Most players leave it as the underside of the floor above — a flat expanse of planks or stone. At a minimum, add rafters: a row of Logs running along the ceiling in one direction, spaced every 2–3 blocks, with Trapdoors folded flat against the ceiling between them for panelling. This instantly transforms a bare ceiling into an architectural feature that makes the room feel finished and designed.
11. Custom Landscaping
A remarkable building on poorly managed terrain looks accidental. Great builds are inseparable from their environment — the landscape and the structure feel like they grew together. Landscaping is the art of making that feel intentional.
The first rule: never clear a perfectly flat square of dirt and plonk your house on top of it. Build into the terrain. Let one corner of the building embed into a hillside. Let another face outward over a natural slope. Use the terrain as a design feature, not an obstacle.
Custom Path Design
Vanilla dirt paths are serviceable but generic. For character, mix Path Blocks (60%) with Coarse Dirt (20%), Gravel patches (10%), and occasional Mossy Cobblestone stepping stones (10%). Curve the path with a natural arc rather than running it perfectly straight. Line paths with Lanterns on Fence posts at irregular intervals, Oak Trapdoor signs, and clusters of Ferns or Tall Grass planted in Coarse Dirt margins.
Custom Trees
Vanilla saplings create vanilla-sized trees, which look completely out of scale next to a large base. For dramatic landscaping, use a custom tree structure: build your trunk from 1–2 wide Log columns, branch outward with diagonal Log beams at 45° angles, and manually place leaf layers at varying densities around the branch tips. A custom oak with a 3-block-wide trunk and 12-block canopy next to your base transforms the perceived scale of the entire scene.
12. Build With Reliable Block Palettes
Version-specific block lists change, but strong palette design stays useful in every Minecraft release. Instead of chasing rumored blocks, build around existing families with clear contrast: one base material, one trim material, one accent color, and one lighting block.
Sandstone, Cut Sandstone, Smooth Sandstone, Copper, Honey Blocks, and Terracotta create warm temples, market halls, and Badlands builds without relying on speculative update content.
Red Terracotta, Granite, Bricks, Nether Bricks, Blackstone, and Deepslate work well for strong floors, forge rooms, villain bases, and darker underground corridors.
Stone, Andesite, Tuff, Calcite, Dripstone, Stairs, Walls, and Slabs give cave bases natural depth. Vary the density so the texture feels intentional instead of noisy.
Lanterns, Shroomlights, Froglights, End Rods, Sea Lanterns, and Glow Lichen can be hidden behind trapdoors, leaves, carpets, slabs, or glass to keep builds bright without torch spam.
Combine Old Blocks Like New Blocks
Most professional-looking builds come from restraint. Try Calcite + Smooth Quartz + Exposed Copper for a clean modern palette, Granite + Sandstone + Terracotta for a desert civilization, or Deepslate + Blackstone + Red Terracotta for a heavy underground fortress. These combinations are stable across current versions and easy for players to reproduce.
Before planning a long-term build, check the version notes for your Java or Bedrock release and test the palette in creative mode. Reliable block availability matters more than chasing unverified update rumors.
13. Biome-Specific Building Styles
The biome you build in is the single most powerful free design tool available. The terrain, ambient light, plant life, and colour temperature of the surrounding environment set a context that your build either works with or fights against. Great builders choose their biome intentionally and design their palette to complement it.
Best palette: Oak + Stone Bricks + Brick + Terracotta. Flat terrain = large footprints. Ideal for long manor houses, walled farms, and market town builds. Sunflower Plains give a yellow accent biome.
Best palette: Spruce + Dark Oak + Stone. The natural spruce trees and snow-dusted ground frame dark wood builds perfectly. A-frame roofs and stone foundations are ideal here.
Best palette: Sandstone + Terracotta + Copper + red terracotta accents. The multi-colour Terracotta layers make the Badlands the most visually rich terrain for warm-tone builders.
Best palette: Deepslate + Calcite + Stone Bricks. Natural cliff faces become your walls for free. Embed buildings into cliff overhangs for dramatic overhanging architecture.
Best palette: Jungle Wood + Mossy Cobblestone + Bamboo + Vines. Build vertically — wrap structures around existing mega-trees. Temple ruins half-consumed by vegetation are iconic here.
Best palette: Prismarine + Dark Prismarine + Glass + Cyan Concrete. Conduit at the centre enables underwater survival. Warm Ocean coral provides free organic decoration.
14. Defense & Perimeter Design
A survival base that looks beautiful but can be breached in seconds has failed at one of Minecraft's core requirements. Defense design doesn't mean sacrificing aesthetics — the best-looking medieval, gothic, and industrial bases are also the most defensible.
The Perimeter Wall Hierarchy
Think of your defenses in three concentric rings: the outer moat or cliff (natural or terraformed barrier that slows approaches), the perimeter wall (the hard barrier — minimum 5 blocks high, with a 2-block overhang at the top to prevent ladder climbing), and the interior keep (the final fallback with reinforced walls and a single choke-point entry).
The Anti-Creeper Entry Design
Creepers are the primary threat to any exterior wall. The most effective anti-creeper entry uses an airlock design: a double-gate system where the outer gate must be closed before the inner gate can be opened. This prevents creepers from following you in. Build the airlock vestibule using Iron Doors activated by a concealed button on the interior side only — accessible to you, not pathfinding mobs.
Vanilla Defensive Details
Use vanilla blocks that slow movement or punish careless pathing without making the wall look messy. Sweet berry bushes, cactus strips, powder snow traps, magma-block edges, and water-filled moats can all add friction around a perimeter. Keep these details outside the main doorway, leave yourself a clear maintenance path, and light every hidden ledge so the defense does not become a mob farm by accident.
15. Mega-Base Planning
Mega-bases — those sprawling, multi-structure complexes that take months to complete — require a fundamentally different approach to planning than small builds. Jumping in without a master plan almost always results in an incoherent collection of structures that look disconnected and unfinished.
The Zone-Based Planning Method
Before placing a single block, divide your mega-base into functional zones. A standard residential mega-base typically has five: Residential (living quarters, bedrooms, storage), Industrial (farms, smelters, workshops), Agricultural (crop fields, animal pens, greenhouse), Civic (town square, market, library), and Defensive (walls, towers, armory). Mark each zone's footprint with a different Concrete colour on the ground before building, and plan connecting roads between them.
Visual Anchors and Landmarks
Every mega-base needs at least one dominant visual anchor — a structure tall or bold enough to be visible from any point in the complex and serve as a navigational landmark. This is typically a central tower, a large dome, or a signature gate. Without an anchor, mega-bases feel like flat sprawl regardless of their quality. Your anchor should be the tallest structure in the complex by at least 15–20 blocks and should use the most visually striking palette combination available.
Always plan expansion corridors — clear, unbuilt pathways between your zones that you preserve for future additions. Every mega-base builder eventually runs out of space and wishes they'd planned ahead. A 10-block-wide buffer between zones costs nothing and saves enormous frustration six months later.
16. Best Seeds for Building — Java and Bedrock 2026 releases
The right seed provides the terrain that makes your build come alive without months of terraforming. These seeds are hand-picked for builders — each offers a distinct terrain type with exceptional natural features that serve as the canvas for large builds.
| Seed | Edition | Terrain Type | Why It's Great for Building | Rating |
|---|---|---|---|---|
| -4379469131957062683 | Both | Cliff + River Valley | Natural cliff walls 40+ blocks tall adjacent to a wide river. Near-perfect castle terrain, no terraforming needed. | ⭐⭐⭐⭐⭐ |
| 2816761820 | Java | Massive Plains Plateau | 400×300 block flat Windswept Plateau at Y 100. Infinite flat building space with dramatic drop-off edges. Ideal for sky-city or mega-base. | ⭐⭐⭐⭐⭐ |
| -1521576534 | Both | Island Village + Surrounding Ocean | Village on a large island surrounded by a natural harbour. Renovation + expansion into a port city is the obvious brief. Coral reefs offshore. | ⭐⭐⭐⭐⭐ |
| 8638613833825887773 | Both | Badlands Canyon | Deep Badlands canyon with multi-level Terracotta exposed on every wall. Pairs perfectly with sandstone, copper, granite, and red terracotta palettes. | ⭐⭐⭐⭐⭐ |
| -3321629671658505799 | Java | Jungle + Mountain Hybrid | Jungle megabiome that transitions directly into a mountain range. Treehouse cities that rise into the cliffs are possible here without touching the terrain generator. | ⭐⭐⭐⭐⭐ |
| 3527990907 | Both | Frozen Lake + Taiga Clearing | Perfect flat frozen lake 200+ blocks wide surrounded by old-growth Spruce Taiga. Nordic village, ice palace, or winter market town — this is the seed. | ⭐⭐⭐⭐⭐ |
| -4882483897544031684 | Both | Cherry Grove Valley | Enclosed Cherry Grove valley framed by Stone peaks on three sides. Pastel palette natural setting — Japanese garden, ryokan, or shrine complex builds are the obvious fit. | ⭐⭐⭐⭐ |
Use the Minesite Seed Map Planner to preview any seed's biome layout, structure locations, and terrain before loading it in-game. Supports Java 26.2 and Bedrock 26.30 world gen.
Builder-Tested Seeds from Our Library
These curated seeds from our seed library feature terrain specifically suited for base building — each with full screenshots, coordinates, and seed map links:
- Massive Cliff Valley with Dense Forest — Natural cliff walls for embedded castle builds.
- Cherry Hills and Snowy Peaks — Pink-and-white palette for fantasy-themed bases.
- Snow Ring Mountain Valley — Protected valley surrounded by snowy peaks — natural fortress terrain.
- Incredible Hollow Mountain — Build inside a hollow mountain interior with natural lighting.
- Twin Mountain Bowl Valley — Two valleys for hub-and-spoke mega-base planning.
17. Common Mistakes to Avoid
Knowing what not to do is often faster than learning what to do. These are the eight most common mistakes that keep builds looking amateurish — and the fix for each one.
A pure symmetrical pyramid stair roof on a square house is the single most identifiable hallmark of a beginner build. It looks like a tent, not architecture.
Change your floor plan to an L, T, or irregular shape. Offset rooflines and use gable ends where rooflines intersect. Add a central ridge and two slopes instead of four meeting at a point.
Full Glass blocks for cottage, medieval, and rustic windows look completely wrong — they create frameless, modern-looking apertures that clash with organic build styles.
Use Glass Panes, which sit in the middle of the block space and create mullions. Reserve full Glass blocks for modern, industrial, and underwater builds only.
Players spend hours on walls and floors and leave the ceiling as bare planks or stone. It's the last surface to be designed and the first to be noticed by visitors.
Add Log rafters running in one direction, Trapdoor panel cladding between them, and a central chandelier made from Iron Bars + Lanterns. This alone transforms any interior.
A wall made entirely of one block type tiles visibly and reads as synthetic. This is the absence of the texture blending technique — the most common mistake of all.
Establish a dominant block (60–70%), a secondary blend (20–30%), and a 5–10% accent. Apply the accent only to corners, trim lines, and transition zones.
A house that sits perfectly flat on the ground with no foundation looks like it was placed by a command block. It has no visual weight or groundedness.
Embed the base into the ground by 1–2 blocks. Add a darker foundation layer extending underground. Allow terrain to come up and touch the building on at least one side.
Wall-mounted torches are a relic of Minecraft's earliest builds. In 2026, they read as placeholder lighting that was never replaced.
Switch to Lanterns on Fence posts, carpet lighting, candle clusters, or light-emitting block ambient strips. If you need wall-mounted light, use a Lantern hung from an Iron Bar hook for character.
The gap between your building and the surrounding terrain — often just bare dirt — is the most jarring part of many builds when seen from ground level.
Create a 3–5 block soft landscaping border: a mixed-texture gravel/path/coarse-dirt zone with plantings, custom trees, and flower beds. This seams the build into the environment naturally.
A front door that's 1 wide and 2 tall looks correct mechanically but small architecturally. A single window in a 10-block-wide wall looks like a prison window.
Scale your architectural features to the building: doors on large structures should be 3–4 blocks wide and 4–5 tall (with an arched header). Windows should be in clusters of 2–3, or use a full bay window on large facades.
18. Frequently Asked Questions
The Rule of Depth means never building a perfectly flat wall. By extruding structural columns one block outward and recessing infill panels one block inward, you create a 3D profile that generates natural shadows and highlights. This single technique makes even a basic stone block wall look architecturally complex and intentional. The standard system is 1–2–1: columns at the front plane, infill one block back, window glass one more block back.
The ratio matters most: one dominant block (60–70%), one secondary (20–30%), and one accent (5–10%). For stone, mix Stone Bricks, regular Stone, Andesite, and Cobblestone. For wood, Oak Planks, Stripped Oak Log, and Spruce Trapdoors. For warm modern builds, sandstone, terracotta, honey blocks, and exposed copper pair well for warm modern builds. Never use two competing primaries at equal proportions — one must always dominate.
The three main techniques are: Carpet Lighting (Glowstone or Sea Lantern under any carpet), Under-Slab Lighting (light sources placed beneath a bottom-half slab floor — light passes through), and Leaf Bush Lights (a Shroomlight surrounded by Oak Leaves creates a glowing decorative bush). Froglights, sea lanterns, end rods, and shroomlights also work as embedded wall and ceiling strips. Always verify full floor coverage with the light level overlay — light level 0 still spawns mobs in Bedrock Edition.
It depends entirely on your aesthetic. Plains are best for large flat footprints and traditional manor builds. Taiga is unmatched for Nordic and log cabin styles — the natural spruce framing does half the design work. Mountains provide natural cliff walls and dramatic elevations for fortress builds. Badlands has the richest natural colour palette and pairs perfectly with terracotta, sandstone, copper, granite, and deepslate. Cherry Grove, introduced in 1.20, remains the best biome for Japanese and pastel-style builds. For underwater builds, Warm Ocean with coral is the obvious choice.
Start by dividing the footprint into functional zones (Residential, Industrial, Agricultural, Civic, Defensive) and marking them with different Concrete colours on the ground. Plan a central visual anchor — a tall tower or dome — visible from every zone. Establish connecting roads between zones before building walls. Always leave 10-block expansion corridors between zones for future growth. Work outward from the centre in phases, fully completing each zone's exterior shell before beginning the next, to maintain a consistent sense of progress and prevent the sprawl feeling.
Absolutely. Dripstone, tuff, calcite, deepslate, blackstone, granite, terracotta, and copper all work above ground when you use them intentionally. They are ideal for desert temples, Badlands canyon builds, underground ruins, horror floors, Nether-themed rooms, gothic builds, garden feature columns, and perimeter details. You do not need to build underground to borrow a cave palette.
READY TO START BUILDING?
Find the perfect terrain for your next project. Our Seed Map Planner lets you preview biome layouts, flat areas, river valleys, and cliff terrain for the Java or Bedrock version you plan to play before you load it.